Subsurface Drip Irrigation Installation: What Farmers Can Expect
Subsurface Drip Irrigation Installation: What Farmers Can Expect
Subsurface drip irrigation stands out as a highly effective modern solution for efficient water management in agriculture. By delivering water directly to the root zone, this method minimizes evaporation and runoff, providing plants with exactly what they need to thrive. Farmers looking to optimize their yields while conserving resources often find that moving to an underground system transforms their entire operation.
Water conservation and precision agriculture are increasingly critical in current farming environments. Drought conditions, strict water regulations, and the rising costs of agricultural inputs demand that every drop of water is utilized efficiently. A properly installed subsurface system not only reduces water waste but also allows for precise nutrient delivery, leading to healthier crops and more sustainable farming practicenunnvjs.
This guide will walk farmers through the entire installation process of a subsurface drip irrigation system, covering key considerations and practical insights. From the initial site assessment to the final system testing, understanding these steps helps ensure a smooth transition and long-lasting performance for your fields.
The Initial Site Assessment and Planning
Evaluating Soil Composition and Topography
Understanding how your specific soil type absorbs water dictates the exact depth and spacing required for the underground lines. Sandy soils drain quickly and may require closer emitter spacing, while clay soils hold moisture longer and allow for wider gaps. Topography also plays a crucial role, as elevation changes influence water pressure and require careful planning to prevent uneven distribution across the field.
Determining Water Source Capacity and Quality
Testing your well or surface water helps identify necessary filtration needs to prevent underground emitters from clogging. High levels of particulate matter, algae, or dissolved minerals can quickly compromise a subsurface system. A comprehensive water quality report will guide the selection of appropriate sand media or screen filters, ensuring the long-term reliability of your irrigation infrastructure.
Mapping Out the Field Layout and Zones
Creating a detailed grid of your acreage ensures water pressure remains perfectly balanced across elevation changes and field boundaries. This mapping process divides the farm into manageable irrigation zones, allowing the main pump to supply adequate flow to specific areas without being overworked. Proper zoning also accommodates varying crop types and their unique hydration requirements within the same property.
Designing the Blueprint for Optimal Flow
Calculating Friction Loss and Pressure Requirements
Engineering the correct pipe diameters is essential to guarantee that water reaches the furthest corners of your field without losing momentum. As water travels through PVC pipes and drip tape, friction naturally reduces its pressure. Accurate calculations prevent dry spots at the end of the rows and ensure uniform water application from the first plant to the last.
Selecting Tape Thickness and Emitter Spacing
Choosing the right materials depends on crop rotation plans and the expected lifespan of the system. Thicker drip tape resists damage from insects and machinery, making it ideal for permanent installations, while thinner tape might suit shorter crop cycles. Emitter spacing is equally important, as it must match the root structure of the planted crops to provide optimal moisture coverage.
Customizing Your System Design with Western Irrigation
Relying on Western Irrigation’s team of authorized subsurface irrigation designers integrates industry knowledge and cutting-edge technology into a blueprint tailored to your land. These experts analyze field data to specify the exact components needed for maximum efficiency. A customized design minimizes installation hurdles and sets the foundation for a highly productive agricultural watering system.
Trenching and Laying the Mainline Infrastructure
Excavating Trenches for PVC Mainlines and Submains
Using heavy machinery to dig deep trenches along the perimeter of the field houses the primary water delivery pipes securely underground. These trenches must be straight and consistently graded to prevent air pockets from forming within the lines. The mainlines act as the central arteries of the system, carrying high volumes of water from the pump station to the individual submain zones.
Installing Critical Valves and Air Vents
Placing air relief valves at high points in the field prevents vacuum-induced collapses and dirt suction when the system shuts off. Flush valves are also installed at the ends of the submains to allow for regular maintenance and debris removal. Properly positioned valves protect the integrity of the PVC pipes and keep the internal network clean and functional.
Ensuring Proper Depth to Avoid Equipment Damage
Burying the mainlines deep enough ensures that future plowing, harvesting, or heavy tractor traffic will not crush the PVC pipes. The depth requirement varies based on the type of machinery used on the farm, but it typically ranges from three to four feet. Taking the time to achieve the correct depth protects the substantial investment made in the mainline infrastructure.
Plowing in the Subsurface Drip Tape
Utilizing GPS-Guided Tractors for Precision Placement
Driving specialized plows equipped with GPS technology injects the drip tape in perfectly straight, evenly spaced rows. This level of precision is crucial for ensuring that future planting aligns perfectly with the underground water source. GPS guidance eliminates human error, resulting in a highly uniform grid that maximizes the efficiency of the entire field.
Managing Tape Depth for Optimal Root Zone Hydration
Adjusting the plow depth ensures the water is delivered directly to the root zone, minimizing evaporation and runoff. If the tape is too shallow, water may pool on the surface; if it is too deep, shallow-rooted plants may struggle to reach the moisture. Finding the exact depth based on the specific crop type guarantees that every drop of water is utilized effectively.
Securing the Ends and Connecting to Supply Lines
Splicing the thin drip tape into the rigid submain pipes and sealing the ends tightly creates a closed, pressurized loop. High-quality fittings and careful assembly prevent underground leaks that can wash out crops and waste water. Secure connections guarantee that the pressure remains consistent throughout the lateral lines, enabling uniform emitter performance.
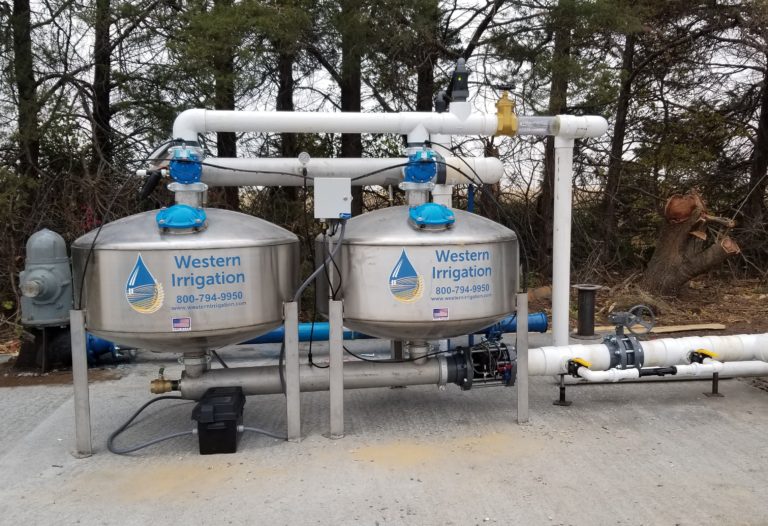
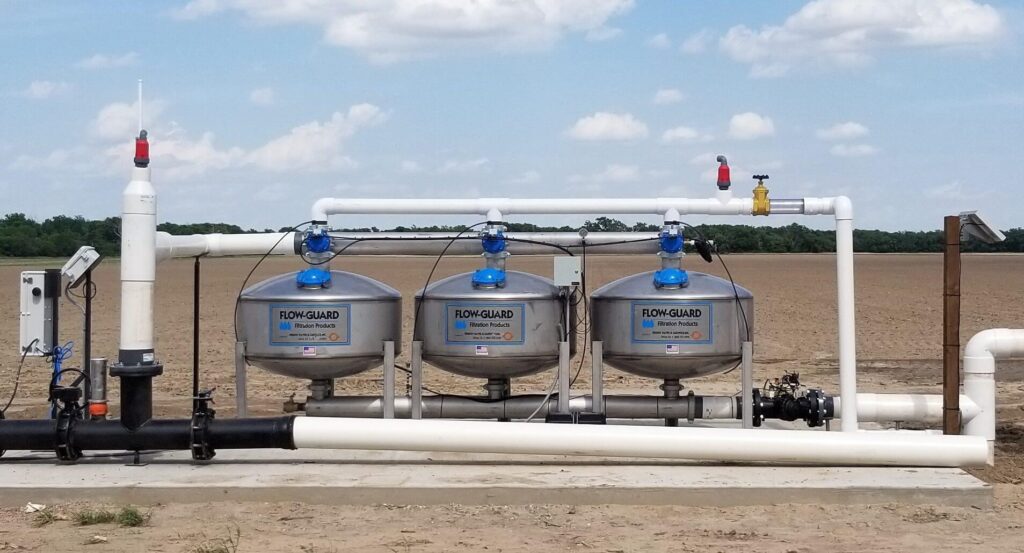
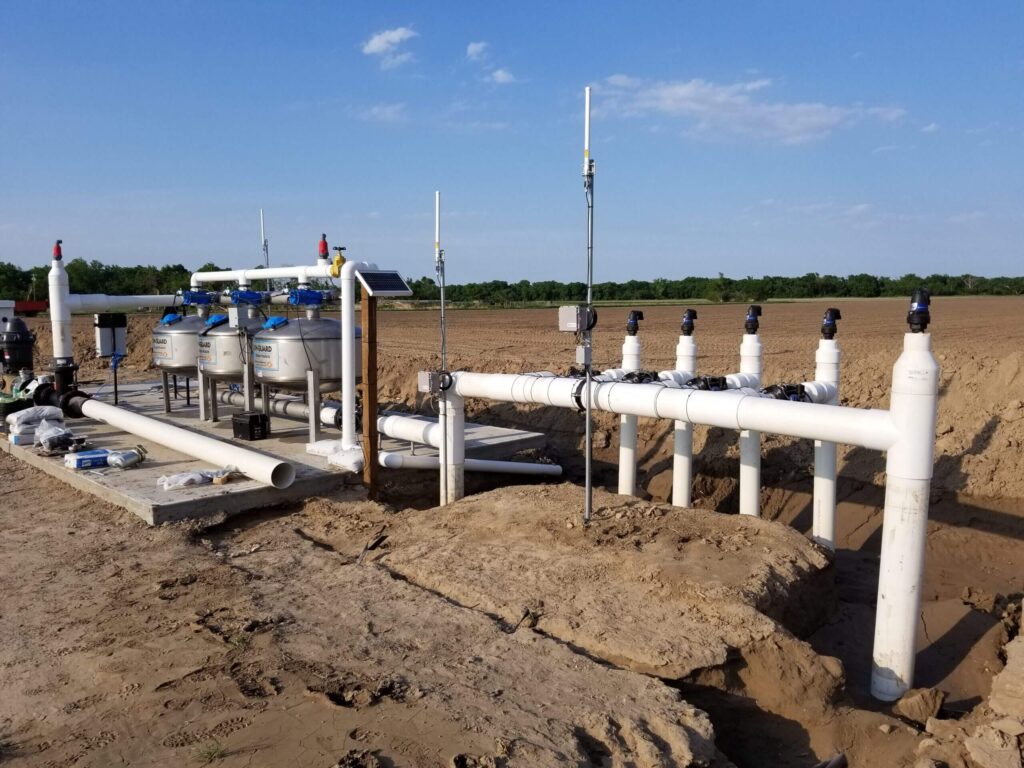
Setting Up the Filtration and Pumping Station
Installing Filters to Prevent System Clogs
Constructing the central sand media or screen filtration bank acts as the primary defense system against sand, algae, and mineral buildup. Because the drip emitters are buried and inaccessible, preventing clogs at the source is absolutely mandatory. An automated self-cleaning filtration setup significantly reduces manual maintenance and keeps the water flowing cleanly into the field.
Calibrating the Main Pump for Consistent Output
Wiring and testing the primary water pump ensures it delivers the exact flow rate required by the field’s engineered zones. The pump must be appropriately sized to handle the peak demands of the system without operating inefficiently during lower-demand cycles. Variable frequency drives are often utilized to adjust the pump’s speed, saving energy while maintaining perfect pressure.
Integrating Fertigation Injectors for Nutrient Delivery
Hooking up chemical injection tanks allows farmers to push liquid fertilizer directly through the drip lines straight to the plant roots. This process, known as fertigation, dramatically increases fertilizer efficiency and reduces the chemical runoff associated with traditional broadcast spraying. Injectors are carefully calibrated to mix the exact ratio of nutrients needed for specific growth stages.
Flushing, Testing, and Troubleshooting the System
Conducting the Initial System Flush to Clear Debris
Running water through the entire open network pushes out any dirt or plastic shavings left behind during the assembly process. The flush valves are left fully open until the water runs completely clear, protecting the sensitive emitters from immediate clogs. This critical first step ensures the system starts its operational life with pristine internal lines.
Pressurizing the Lines to Check for Leaks
Closing the flush valves and bringing the system up to full operating pressure identifies weak splices or loose fittings. Technicians walk the field observing the soil surface for unexpected wet spots that indicate an underground rupture. Repairing these leaks before planting begins saves immense amounts of time and prevents localized crop flooding.
Verifying Emitter Flow Rates Across the Entire Field
Measuring the water output at various points in the field confirms that every plant will receive uniform hydration. Pressure gauges are used at the furthest ends of the tape to ensure the friction loss calculations were accurate. Consistent flow rates guarantee an even crop stand and prevent yield variations caused by underwatering.
Training, Automation, and Long-Term Operation
Programming Smart Controllers and Sensors
Setting up digital control panels manages watering schedules and automates flush cycles based on real-time field data. Soil moisture sensors communicate directly with the central controller, ensuring irrigation only occurs when the crops genuinely need it. This automation removes the guesswork from farm hydration and maximizes water conservation.
Establishing a Routine Maintenance Schedule
Reviewing daily and weekly tasks, such as checking pressure gauges and cleaning filters, keeps the system running smoothly over the years. Consistent maintenance prevents small issues from escalating into major underground failures. A proactive approach to system care extends the lifespan of the drip tape and protects the farm’s irrigation investment.
Transitioning Daily Operations to the New System
Learning how to adjust tilling and planting practices protects the underground tape and maximizes harvest yields. Farmers must map their tractor paths carefully to avoid damaging the shallow tape during cultivation. Adapting traditional farming habits to accommodate the subsurface infrastructure is the final step in fully utilizing this advanced agricultural technology.
The Future of Efficient Farm Hydration
Installing a subsurface drip system requires precise planning, heavy machinery, and technical engineering, but the result is an incredibly efficient method of delivering water directly to the root zone. By minimizing evaporation and runoff, farmers can drastically reduce their water usage while simultaneously improving crop health and overall yield. The combination of targeted hydration and precise fertigation creates an optimal growing environment that traditional irrigation methods simply cannot match.
Start preparing for your installation by gathering your field maps and water quality reports, and schedule a consultation with an installation expert to outline your project timeline. Taking proactive steps today ensures a smooth transition to a more profitable and sustainable farming operation tomorrow.