Choosing the Best Subsurface Drip Irrigation Setup for Your Acreage
Choosing the Best Subsurface Drip Irrigation Setup for Your Acreage
Water is the lifeblood of any successful agricultural operation. For those managing large acreages, ensuring every plant receives the right amount of water at the right time is a constant challenge. Traditional irrigation methods, like flood or sprinkler systems, can lead to significant water loss through evaporation and runoff, resulting in wasted resources and inconsistent crop growth. This is where subsurface drip irrigation (SDI) offers a transformative solution.
By delivering water directly to the root zone, subsurface drip irrigation systems provide one of the most efficient ways to irrigate large-scale crops. This guide will walk you through everything you need to know about implementing an SDI setup for your acreage. We will explore the benefits, break down the essential components, and offer practical advice on installation and maintenance. With the right system, you can conserve water, reduce operational costs, and ultimately boost your crop yields.
Why Choose Subsurface Drip Irrigation for Acreage?
Making the switch to a new irrigation system is a significant investment. However, the long-term advantages of SDI for large properties are compelling, offering returns in water savings, crop health, and operational efficiency.
Unmatched Water Efficiency
SDI’s standout feature is its unparalleled water efficiency. By burying the system, it virtually eliminates water loss from evaporation and wind drift, delivering moisture directly to the root zone. For acreage owners, this translates to significant water savings—often 25-50% or more compared to traditional methods—a critical advantage in regions facing water scarcity or high costs.
Improved Crop Health and Yield
SDI boosts plant health and yield by delivering water and nutrients directly to the roots. This creates an optimal growing environment, preventing foliar diseases and soil compaction. The result is better root development, stronger plants, and a more abundant, higher-quality harvest.
Reduced Weed Growth
Weeds steal water, nutrients, and sunlight from your crops. But with SDI, the dry soil surface actively suppresses weed germination, drastically cutting down on weeding time and herbicide use. This means your crops face less competition and can truly thrive.
Enhanced Fertilizer Application (Fertigation)
SDI systems are ideal for fertigation, delivering nutrients directly to the root zone with precision. This method boosts nutrient uptake, reduces fertilizer waste, minimizes environmental impact, and lowers costs. It also allows you to customize nutrient programs for different crop growth stages, ensuring optimal plant health.
Lower Labor and Energy Costs
Once installed, SDI systems require less manual labor than other irrigation methods. They are highly automated, eliminating the need to move pipes or sprinklers. SDI systems also operate at lower pressures than sprinkler systems, leading to significant energy savings over time.
Key Components of an SDI System
A well-designed SDI system is a network of interconnected parts working together to deliver water efficiently. Understanding each component is crucial for planning, installing, and maintaining a successful setup for your acreage.
Water Source and Pump
Your system starts with a reliable water source, which could be a well, pond, river, or municipal supply. A pump is required to create the necessary pressure to move water through the system. The size and type of pump will depend on the size of your acreage, the total flow rate required, and the operating pressure of the drip lines.
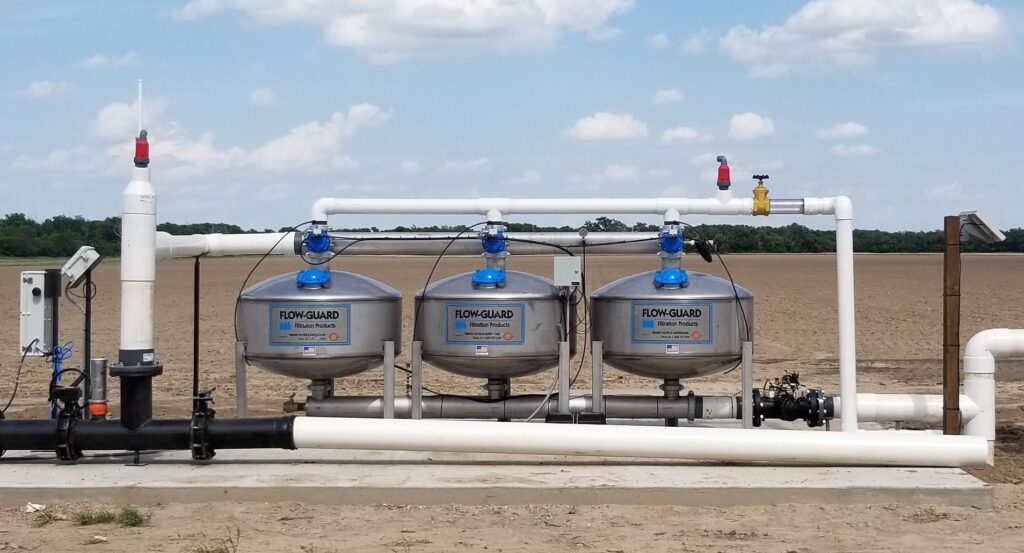
Filtration System
Filtration is arguably the most critical component of any SDI system. The emitters in drip tape have very small openings that can easily become clogged by sand, silt, algae, or other debris. A clog can stop water flow to a section of your crop, leading to plant stress or death. A multi-stage filtration system is essential for SDI.
- Primary Filter (Sand Media or Disc Filter): This is the first line of defense, removing larger particles from the water. Sand media filters are excellent for water with high organic content, while disc filters are effective against inorganic materials.
- Secondary Filter (Screen Filter): Installed downstream from the primary filter, a screen filter catches any smaller particles that may have passed through, providing an extra layer of protection for the emitters.
Mainline and Sub-Mainlines
The mainline pipe carries water from the pump and filter to your fields, usually via a large-diameter PVC or layflat hose. Smaller sub-mainlines then branch off from the mainline, distributing water to different zones. These pipes are typically buried to protect them from UV damage and farm equipment.
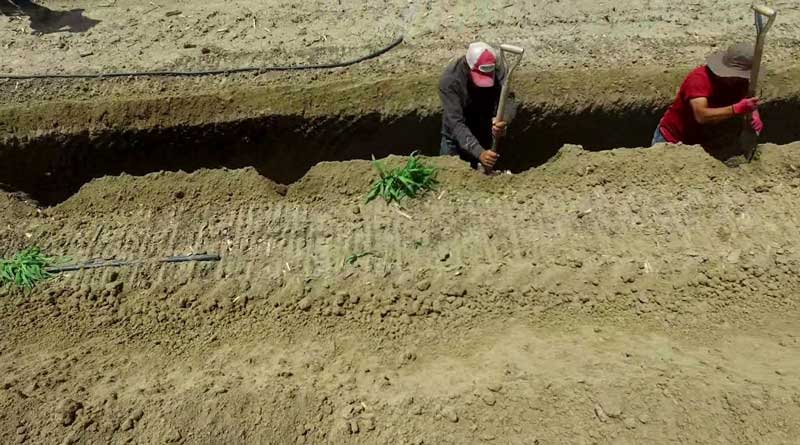
Drip Tape or Drip Line
This component is the core of the SDI system installation. It’s a thin-walled tube with pre-installed emitters, buried between 4 and 12 inches deep, depending on the crop and soil. The quality of the drip tape, particularly its clog-resistant emitters, is crucial for the system’s longevity and performance.
Emitters
Emitters, small devices within the drip tape, precisely control water release into the soil. For SDI, pressure-compensating (PC) emitters are crucial, especially on large or sloped fields. They ensure consistent water flow regardless of pressure fluctuations, meaning all plants receive equal irrigation.
Valves and Pressure Regulators
Valves control water flow to different zones, enabling independent irrigation for various parts of your field. Pressure regulators are essential for maintaining the optimal pressure range; too much pressure can damage the system, while too little leads to uneven water distribution.
Air/Vacuum Relief Valves
These valves are essential for protecting buried drip lines. When the system is turned on, they allow air to escape from the pipes. When the system is shut off, they allow air to enter, preventing a vacuum from forming that could suck soil and debris into the emitters.
Choosing the Right Emitter Spacing
The spacing between emitters on your drip tape is a critical decision that directly impacts water distribution and root development. The ideal spacing depends on three primary factors: soil type, crop type, and crop spacing.
Understanding Soil Type
Soil texture plays a major role in how water moves from the emitter. This lateral movement is known as the “wetting pattern.”
- Sandy Soil: Water moves downward quickly in sandy soils with limited lateral spread. Therefore, emitters need to be spaced closer together (e.g., 12 inches) to create a continuous wetted zone along the crop row.
- Loam Soil: Loam offers a good balance of vertical and horizontal water movement. Emitter spacing can be wider (e.g., 18-24 inches) while still achieving uniform moisture.
- Clay Soil: Clay soils have very slow infiltration rates but excellent lateral water movement. Emitters can be spaced further apart (e.g., 24-30 inches or more) as the water will spread widely to cover the root zone.
Considering Crop Type and Spacing
The root structure and spacing of your crop also influence emitter placement.
- Row Crops (e.g., Corn, Vegetables): For crops planted in distinct rows, the drip tape is typically buried directly beneath or alongside the plant row. The emitter spacing should be close enough to ensure the entire root zone of each plant is watered.
- Orchards and Vineyards: For widely spaced trees or vines, you might use one or two drip lines per row. Sometimes, specific emitters or micro-sprinklers are placed near the base of each plant instead of using continuous drip tape.
- Forage Crops (e.g., Alfalfa): In forage fields, the goal is to wet the entire soil profile. This often requires closer drip line spacing (e.g., 24-40 inches between lines) and appropriate emitter spacing to achieve uniform coverage.
Consulting with an irrigation specialist like Western Irrigation can help you determine the optimal emitter and line spacing for your specific conditions, ensuring your crops get the water they need without waste.
Filtration and Water Quality
As mentioned, proper irrigation is non-negotiable for a long-lasting SDI irrigation system. Water quality issues can lead to emitter clogging, which is the number one cause of SDI system failure.
Common Water Quality Problems
- Physical Clogging: Caused by sand, silt, or suspended solids in the water. This is addressed with sand media, disc, or screen filters.
- Biological Clogging: Caused by algae, bacteria, and slime. This is common in water from ponds or canals. Treatment may involve chlorination or other chemical injections.
- Chemical Clogging: Caused by the precipitation of minerals like calcium carbonate or iron when water chemistry changes. This can be managed through acid injection to lower the water’s pH.
Regular water testing is recommended to identify potential clogging hazards before they become a problem. Based on the test results, a comprehensive water treatment and filtration plan can be developed.
Installation Tips and Best Practices
Proper installation is key to the performance and longevity of your SDI system. While it’s a job often best left to professionals, understanding the process is valuable.
- Plan and Design: Start with a detailed design map of your acreage, marking mainlines, sub-mainlines, and drip line layouts.
- Trenching and Pipe Laying: Mainlines and sub-mainlines are buried below the frost line or deep enough to avoid damage from tillage equipment.
- Drip Tape Injection: A specialized implement is used to inject the drip tape into the soil at a consistent depth without twisting or damaging it.
- System Flushing: Before connecting the ends of the drip lines, the entire system should be thoroughly flushed to remove any dirt or debris from the installation process.
- Install Air Vents: Place air/vacuum relief valves at the high points of the system to protect the drip lines.
- Pressure Testing: Once everything is connected, the system should be pressurized and checked for leaks.

Maintenance and Troubleshooting
An SDI system requires regular maintenance to ensure it continues to operate efficiently year after year.
- Filter Cleaning: Regularly check and clean all filters according to the manufacturer’s recommendations.
- System Flushing: Periodically flush the mainlines and drip lines to clear out any accumulated sediment.
- Chemical Treatment: If you have biological or chemical clogging risks, follow a regular chemical injection schedule (e.g., chlorination or acidification).
- Pressure Checks: Routinely monitor system operating pressures to ensure they are within the optimal range. A drop in pressure could indicate a leak, while an increase could signal a blockage.
- Leak Repair: Although buried, leaks can occur. Look for unusually wet spots on the surface and repair damaged sections of pipe or tape promptly.
Maximize Your Yields with Western Irrigation
Implementing a subsurface drip irrigation system is a powerful step toward optimizing your acreage for productivity and sustainability. The benefits—from significant water savings to healthier, higher-yielding crops—provide a strong return on investment. However, success depends on a well-designed system tailored to your unique land, soil, and crop conditions.
At Western Irrigation, we specialize in designing and supplying custom SDI solutions for large-scale agricultural operations. Our team of experts will work with you from start to finish, from initial water analysis and system design to selecting the right components and providing installation support.
Don’t let inefficient irrigation limit your potential. Contact Western Irrigation today to learn how a state-of-the-art SDI system can revolutionize your farming operation and help you achieve maximum yields for years to come.